Node.js is an open-source and server-side Javascript language that provides a runtime environment. Since its release, Node.js has become one of the most popular programming languages powering major websites and systems in the world. npm is a package manager for JavaScript and it is the default package manager for Node.js. Although Node.js is a powerful language, installing it may not be straightforward.
Installing open-source packages often requires many manual steps. Depending on your OS environment, installing one will be different. Sometimes, as you try to install, you may stumble upon conflicts with existing packages in your environment. In this article, we will learn how to install nodejs and also learn what will be the best way to use the NodeJS stack without hurting your local environment.
How to install NodeJS
There are multiple ways to install NodeJS. Among them, the easiest way is to use Codeanywhere.
Install Node.js & NPM using Codeanywhere
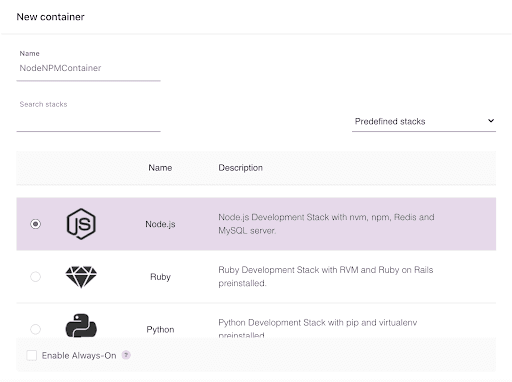
Codeanywhere provides a virtual container that you can launch in less than 60 seconds. When you create a new container, you can simply select your stack of choice such as Node.js. The Node.js dev stack, by default, includes Node.js, nvm, npm, yarn, Redis, and MySQL installed. So you don’t have to go through complicated steps to install all these dependencies.
When you finish free sign-up, you can create a new container and select the stack as below.

When you select Node.js and click “CREATE”, you will be prompted to the new container with the stack. And, that’s it.
To confirm Node.js, in the command line console, run:
$ node --version
This will give you the currently installed Node.js version as below.

Let’s check npm as well by executing:
$ npm --version
You will be able to see its version too.

It takes less than a minute until you have this full-fledged environment. This will give you a quick start to prototype and build your new node.js project. With this method, you can avoid all the pains you could have when setting up the same stack in your local environment.
Install Node.js Windows
If you still want to do it on your own, you can do it by directly downloading the msi file from the node.js official website. There will be two options for Windows. If you are new to Node.js, using the .msi installer will be easier since it contains an executable file. You need to select either 32-bit or 64-bit installer. After installing it, you can run the same node and npm version commands as above to confirm the installation.
Another tool you might want to install is nvm or Node Version Manager. Codeanywhere, when you launch a container, conveniently provides nvm by default. If you want this manager in Windows, you will have to follow the steps guided by Microsoft. As suggested, go to the repository and download the zip file. After unzipping it, execute the exe file to install it.
Once the install is complete, open your PowerShell and check the current NodeJS version by:
$ nvm ls
If you want to develop NodeJS in the Linux environment, however, you can use Codeanywhere since Codeanywhere containers run on Linux.
Install Node.js macOS
For macOS, a recommended way is by Homebrew. Homebrew is a macOS package management tool. If you don’t have Homebrew installed, open your terminal and execute:
$ ruby -e "$(curl -fsSL https://raw.githubusercontent.com/Homebrew/install/master/install)"
Once installed, update Homebrew by:
$ brew update
Then, you can start installing node by:
$ brew install node
Although there is a Mac installer program on the Node website, we recommend using Homebrew to install and update Node. However, if you still prefer the installer, you can go to the same download page and download the .pkg file. There is a .tar.gz file if you prefer. However, the .pkg option can be easier since you can just execute it. After completing installation, check the versions of node.js and npm.
nvm
To install nvm on macOS, you will have to use your terminal. Open your terminal and execute:
$ curl -o- https://raw.githubusercontent.com/nvm-sh/nvm/v0.38.0/install.sh | bash
This will download nvm and start installation. Once downloaded, you need to register the command in your profile by:
$ export NVM_DIR="$([ -z "${XDG_CONFIG_HOME-}" ] && printf %s "${HOME}/.nvm" || printf %s "${XDG_CONFIG_HOME}/nvm")"
[ -s "$NVM_DIR/nvm.sh" ] && \. "$NVM_DIR/nvm.sh"
Once done, now you can start using the nvm command. Check your node version by nvm ls.
Install Node.js Ubuntu & Linux
In Ubuntu or Linux, you can use your default package manager of your OS. If you can use the apt package manager, run:
$ sudo apt install nodejs
And, execute another for npm:
$ sudo apt install npm
After this, you can install nvm by:
$ wget -qO- https://raw.githubusercontent.com/nvm-sh/nvm/v0.38.0/install.sh | bash
Once the download is completed, you need to register the command in your profile.
$ export NVM_DIR="$([ -z "${XDG_CONFIG_HOME-}" ] && printf %s "${HOME}/.nvm" || printf %s "${XDG_CONFIG_HOME}/nvm")"
[ -s "$NVM_DIR/nvm.sh" ] && \. "$NVM_DIR/nvm.sh"
How to install npm?
npm is already included in node.js. When you download and install for Windows and MacOS, the package manager will come together with node.js. If you cannot find npm for Ubuntu and Linux, you can use your OS package manager to install separately.
Wrapping up
Among the methods, except using Codeanywhere, node.js install will usually take way longer than a minute. Plus, there is no guarantee that installation finishes without any dependency conflict or other issue. Even if you successfully install the Node stack, maintaining it can be another challenge. Furthermore, keeping the same versions and consistent environments across your team members requires a lot of effort.
All these can be resolved by Codeanywhere. With Codeanywhere, you can simply launch a pre-built container and start using the stack right away. Codeanywhere provides collaboration features so that your team members can work together simultaneously.
Try it right now for free and launch your Node development stack in 60 seconds!


